Sunday, May 26, 2024

Tips&Tricks Guide: What's Ruining your Brownies?


 Hear me out!, More butter is not always the answer!

It took us nearly one whole month, but we did it: I tested more than 50 batches of brownies. I didn't do this to ourselves for the hell of it—I did it because too many people are relying on bad boxed mixes. Over the course of my testing (and tasting), there were a lot of sugar crashes and a lot of fails. But in this desperate and trying attempt to achieve brownie perfection, I learned a lot—and I am not about to keep it all to ourselves (referring to out bakers). Below is our handy guide to save you from our mishaps so you can make perfect homemade (chewy, fudgy, cakey, or gluten-free!) brownies. Save it forever and make all of our cocoa-filled misery worth it. Please?


Mistake #1: Too Much Flour

Brownies don’t need a lot of flour. Of our four main recipes, cakey brownies clock in with the largest amount of flour, at 1¼ cups. That’s not a lot. For context, most chocolate sheet cakes call for at least 2 cups. If you add too much flour, your brownies will likely come out too dry and taste stale.

If you’re following a recipe to a T and your brownies still taste too dry, you may be overpacking the flour during the measuring process. We recommend spooning flour into a measuring cup then gently leveling the top with back of a butter knife. If you scoop straight from the flour bag, you risk scooping too much!

Mistake #2: Overbaking

Brownies should always have some moist crumbs come out with a toothpick. If your toothpick is clean, your brownie’s crumb will be dry and cakey, but not in a good way. Even our cakey brownie doesn’t call for a clean toothpick test!

Mistake #3: Too Much Cocoa Powder

More cocoa powder doesn’t necessarily mean a stronger chocolate flavor. Instead, it makes brownies taste like dirt. Trust us on this one.

Mistake #4: Too Many Eggs

When trying to make a fudgy brownie batch, our first thought was to add more eggs—which worked to an extent. But, most obviously, too many eggs will make brownies taste eggy. What was more surprising to us was that fresh from the oven, the over-eggy brownies looked like a souffle. Then in a matter of minutes, they sunk DRASTICALLY.

Mistake #5: Not Enough Sugar

In trying to intensify the chocolate, some of us tried to reduce the sugar. When the sugar content decreased by too much, the brownies came out very flat and tasted both bitter and dry. When whisking (or beating) together sugar and fat, you’re incorporating air into the batter and thus creating lift in your brownies. Less sugar means less beating means flat brownies.

Mistake #6: Too Much Fat

Sadly, more butter is not always better. When too much fat is incorporated, brownies become extremely fudgy, in a seriously bad way. They’re slick and greasy, two traits you never want to hear when you’re talking about baking.

Mistake #7: Yolks Only

In an effort to create the fudgiest brownie, Makinze thought she should try using yolks only. Terrible mistake. The resulting brownies were dry, crumbly, and quite frankly, inedible. Taste testers said they tasted like sand, which was harsh but not untrue.

Mistake #8: Cutting Too Soon

If you’re struggling to cut your brownies, they’re likely too warm. For clean squares with pretty edges, you must wait until they’re cooled to room temperature. Make it easier on yourself and bake them the night before.

So that' it for today!, Hope you are enjoying our little corner of sweetness out here...see you then!


Saturday, May 25, 2024

Introduction: Delish Pasteleria, Where Sweet Dreams Take Shape


 Dear Dessert Lovers,

In the heart of New York city, where cobblestone streets wind through charming neighborhoods, there exists a little haven—a place where the scent of freshly baked treats wraps around you like a warm embrace. 

Welcome to Delish Pasteleria!

Our Origins

Delish Pasteleria is a bakery established since 2001 in NYC. Picture a cozy kitchen, sunlight streaming through lace curtains, and a housewife preparing a sunday dessert for her kids, when this thought strikes her husband’s mind .That’s where our story begins.

The Artistry

Started as a mere bakery shop, We are now a family of 112 bakers. Our bakers are more than mere culinary wizards; they’re artists. Each cake layer is a canvas, every macaron a delicate brushstroke. We believe that baking isn’t just science; it’s magic. And magic deserves an audience.

The Menu

Let’s talk about our stars—the treats that make hearts skip a beat:

  1. Velvet Cupcakes: Soft as whispered secrets, these crimson beauties come crowned with cream cheese frosting. One bite, and you’re in love.
  2. Caramel Macarons: Crisp shells yield to gooey centers—a symphony of flavors. Close your eyes; let them dance on your tongue.
  3. Choco-Hazelnut Cake: Layers of indulgence—chocolate sponge, hazelnut praline, and ganache. It’s a crescendo of bliss.
  4. Lemon Poppyseed Muffins: Sunshine in a crumb. Zesty lemon notes play tag with crunchy poppyseeds.

Our Promise

  • Quality: We source ingredients locally, ensuring freshness. No shortcuts, no compromises.
  • Warmth: When you step into Delish Pasteleria, you’re family. Our smiles are as warm as our ovens.
  • Community: We’re more than a bakery; we’re a sweet sanctuary. Come for the treats, stay for the laughter.

Follow Our Journey

Our homely bakery awaits! Follow us on Instagram (@delishpasteleria) for behind-the-scenes glimpses, recipes, and sweet inspiration. Let’s create a sugar-coated community—one where joy rises like perfectly baked soufflés.

Remember, life is too short to skip dessert. So, grab a fork, savor the moment, and let Delish Pasteleria be your sweet refuge.


With love,

The Delish Pasteleria Team

Friday, May 24, 2024

Recipe Guide1: Velvet cupcakes

 Hello Bakers!, Hope you are having a sweet Day! Today, we are here to spill some of our best tips and tricks to make our all-time speciality, Velvet cupcakes. And here's my verdict, I have had a great love for cupcakes since childhood because my mom used to make them so fluffy and moist plus the cheese frosting on the top was just chef's Kiss! 

So, let's start with Our Recipe for the day!

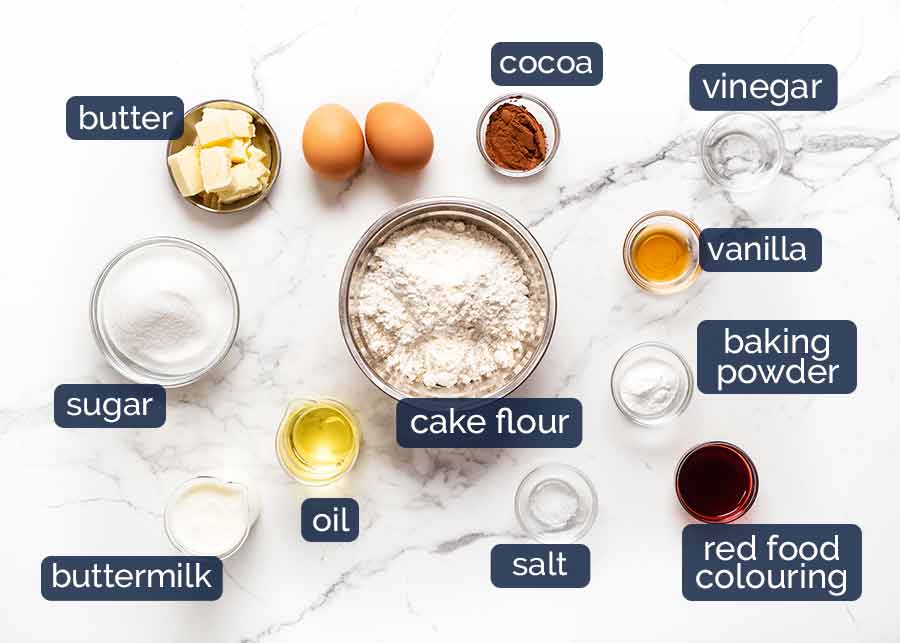
Here’s what you need for the Red Velvet Cupcakes. You might be wondering – vinegar? Why oil AND butter? And is cake flour really necessary? Read on to find out the answers!

Ingredients for Red Velvet Cupcakes
How to make velvet cupcakes:

The making part is really no different to typical butter based cakes.

How to make Red Velvet Cupcakes
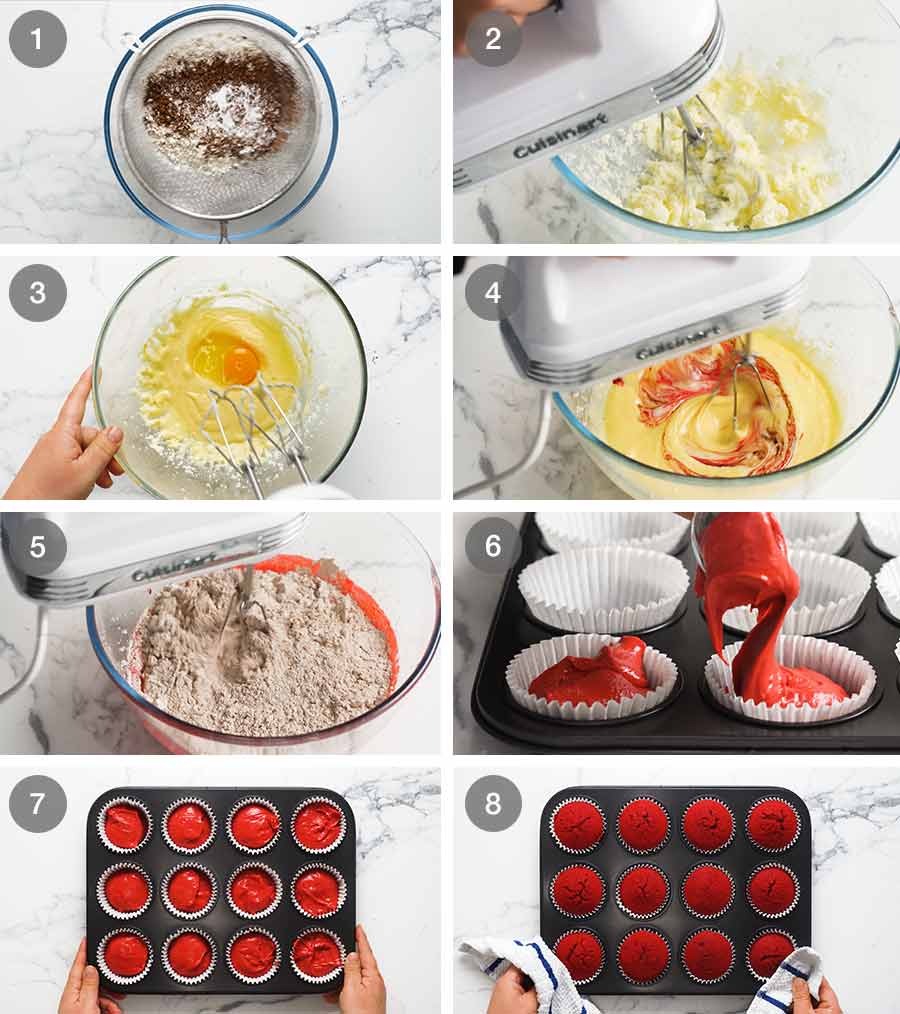
  1. Sift the dry ingredients into a bowl so they’re lump free. I don’t like sifting, but in this situation, it’s necessary because cocoa powder has a tendency to get lumps in it.

  2. Cream butter, then sugar – Cream the softened butter and beat with an electric beater or a stand mixer for 1 minute until it’s smooth. THEN add the sugar and beat for a further 2 minutes until it’s fluffy and the butter has changed from yellow to very pale yellow, almost white.

  3. Eggs – Add eggs one by one, beating in between until incorporated.

  4. Oil, buttermilk, vinegar and vanilla – Then beat in remaining wet ingredients until incorporated.

  5. Add Dry Ingredients – Lastly, add the Dry ingredients and mix for just 30 seconds until incorporated and you no longer see streaks of flour. There may be some small lumps still, and that’s ok. It’s better than over mixing which is a common mistake with cupcakes. This causes the batter to be over worked which makes the cupcake less tender.

    Important – Once the dry ingredients are mixed with the wet ingredients, do not stop. Fill the muffin tin and get it in the oven quick smart. The reason is because once the wet ingredients are combined with the dry, the baking powder is activated. If you leave it sitting around, the baking powder will be bubbling away in the raw batter and by the time it’s baked, it won’t rise as well. This rule applies to all baking recipes!

  6. Fill muffin tin with the batter. It makes 12 perfect cupcakes, so divide all the batter between the 12 holes. If you use a standard muffin tin with cupcake liners the size I use, then it should fill the paper liners 3/4 of the way up to produce perfectly domed cupcakes!

  7. Bake for just 20 minutes in a 180°C/350°F (160°C fan) oven, or until a toothpick inserted in the middle cupcake comes out clean.

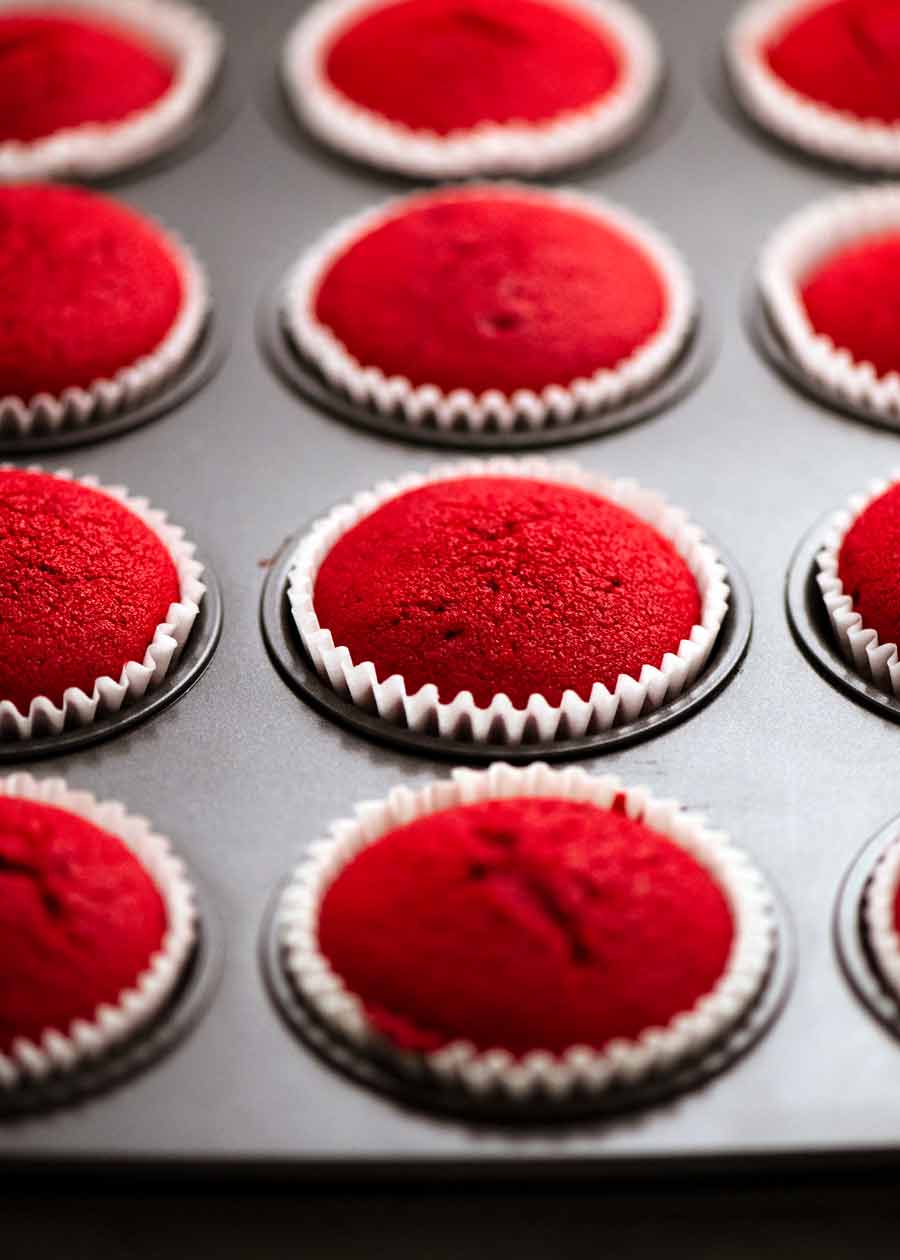
  8. The surface of some of the cupcakes will be a little cracked. But that is absolutely no issue. Because in what world do people send out unfrosted cupcakes?? 😂

    Cool completely before frosting. Warm cupcakes with butter based frosting = disaster! (In the form of melted frosting!)

Red Velvet Cupcakes fresh out of the oven

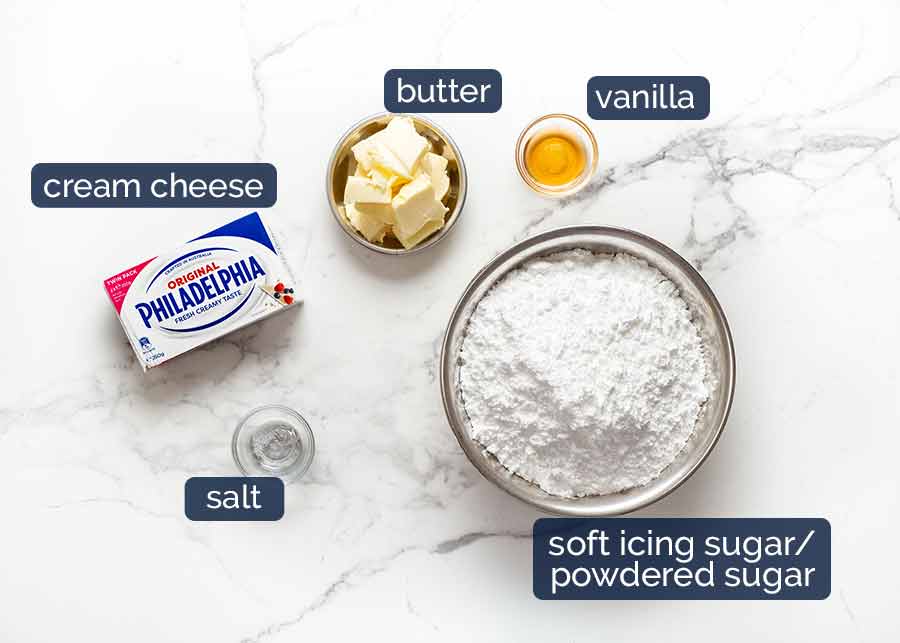
Ingredients for Cream Cheese Frosting for Red Velvet:

Cream Cheese is the most common frosting you see these days for Red Velvet Cake and Cupcakes, and that’s what I’m sharing today. The creamy, fluffy sweet frosting with the tang from cream cheese is a perfect match with the cupcakes!
Ingredients for cream cheese frosting for Red Velvet Cupcakes

How to make Cream Cheese Frosting:

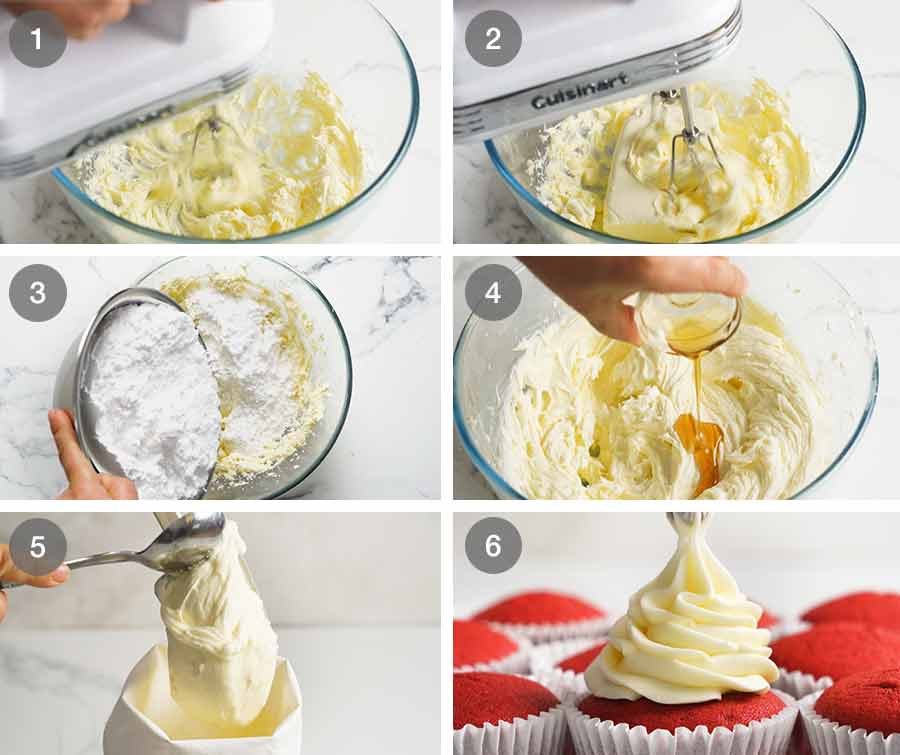
The trick to making a lovely fluffy, creamy cream cheese frosting is to beat, beat, beat. Oh – and to beat the butter first before adding the cream cheese, and to add the icing sugar in parts so you don’t get a dust storm in your face!

How to make Cream Cheese Frosting for Red Velvet Cupcakes
  1. Cream butter: Beat the butter first for 1 minute until it’s smooth and starts to become paler in colour – speed 6 on stand mixer using the paddle attachment, or speed 9 for electric beater. I do this because the butter needs to be creamed longer than cream cheese. It also helps to make the frosting more white – butter changes from yellow to almost white the longer you beat it.

  2. Cream cream cheese: Add cream cheese then beat for a further 1 minute on the same speed until smooth.

  3. Add icing sugar: Add icing sugar in 4 batches, beating in between until incorporated, starting on speed 1 so you don’t get a dust storm in your face! If you do have dust storm problems, just place a clean tea towel over the bowl as you beat.

  4. Beat until fluffy: Add vanilla and salt, then beat for 2 minutes until fluffy – speed 6 with stand mixer, speed 9 with electric beater. It should be creamy but still hold its shape in a peak (see video). If it’s too sloppy, place in fridge for 30 minutes, then beat again.

  5. Piping bag: Transfer into piping bag with desired piping tip.

  6. Pipe onto cupcake, swirling it up nice and high! This recipe makes enough to generously frost 12 cupcakes as pictured in post.

Don't forget to add your personnel touches to the cupcakes!, Happy baking!


Tips&Tricks Guide: What's Ruining your Brownies?

 Hear me out!, More butter is not always the answer! It took us nearly one whole month, but we did it: I tested more than   50 batches of br...